Precision Ball and Gauge
High quality, precison made balls and related products
Call us: +44 (0) 1903 231831

High quality, precison made balls and related products
Call us: +44 (0) 1903 231831

We take pride in our reputation for delivering high quality balls and ball products in a wide variety of materials and tolerance grades.
Our Quality Control department, using state of the art equipment, rigorously measure and check statistically for compliance with our customers' orders and relevant international standards ISO 3290, AFBMA Standard 10, and Din 5401. Certificates of Calibration or Conformance can be supplied, giving you the peace of mind in knowing these really are balls of the finest quality available today.
With massive stocks of quality balls from 0.4mm to 100.00mm diameters, we are certain to stock your exact requirements. From our highly organised delivery system to our three day turn around on most special production orders (subject to quantity ordered) .... we offer a service rarely matched by our competitors.
Our flexibility combined with extensive experience of ball finishing allows us to tailor our products and production capabilities to meet any requirement for precision balls. Whatever your precision ball needs, we have the ability and desire to deliver the right product, on time, everytime.

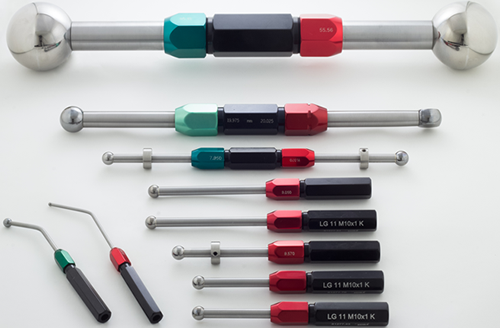
Gauges are available double or single ended with wire-type handles.
Used to provide locations and position reference for both manufacturing tooling and for metrology.
For handling or identification purposes, having a ball attached to a stem or wire of some form can greatly simplify the use of the ball.
Half or part balls, balls with through or blind holes, balls with internal threads, or flats. In many instances where a spherical or partially spherical surface is required.
.... call us with your requirements

Address
Precision Ball and Gauge Co. Ltd.
Timberlaine Trading Estate
Decoy Road
Worthing
BN14 8ND, England
Contacts
Email: sales@precisionball.co.uk
Phone: +44 (0) 1903 231831
Fax: +44 (0) 1903 203111
Privacy Policy
 |
Ball Specifications |
|
Steel Balls are manufactured to a number
of international standards produced to meet the needs of Bearing manufacturers.
Of these standards, AFBMA 10, ISO 3970, and DIN 5401 are probably
the most common. ISO and DIN are well known organisations,
AFBMA, the "Anti Friction Bearing Manufacturers Association",
is probably less well known, but in relation to ball specifications
is probably the most important, and in general terms all major ball
standards are based on AFBMA 10. DIN 5401 used to be the exception,
but was brought into line with AFBMA 10 in 1993. The specifications define balls in terms of a series of properties:-
|
|||||||||||||||||||||||||||||||||||||||||||||||||||||||||||||||||||||||||||||||||||||||||||||||||||||||||||||||||||||||||||||||||||||||||||||||||
| Specifications | |||||||||||||||||||||||||||||||||||||||||||||||||||||||||||||||||||||||||||||||||||||||||||||||||||||||||||||||||||||||||||||||||||||||||||||||||
|
|||||||||||||||||||||||||||||||||||||||||||||||||||||||||||||||||||||||||||||||||||||||||||||||||||||||||||||||||||||||||||||||||||||||||||||||||
|
|||||||||||||||||||||||||||||||||||||||||||||||||||||||||||||||||||||||||||||||||||||||||||||||||||||||||||||||||||||||||||||||||||||||||||||||||
|
|||||||||||||||||||||||||||||||||||||||||||||||||||||||||||||||||||||||||||||||||||||||||||||||||||||||||||||||||||||||||||||||||||||||||||||||||
Relevance to non bearing applications |
|||||||||||||||||||||||||||||||||||||||||||||||||||||||||||||||||||||||||||||||||||||||||||||||||||||||||||||||||||||||||||||||||||||||||||||||||
| All of the Ball Specifications discussed have been
developed to cover the requirements of the bearing industry. As a result
some aspects of the specifications whilst important to the needs of bearing
manufacture have little relevance to other applications. For example: A high precision angular contact bearing may contain 40 or more balls. If the bearing is to function correctly with minimum run-out, it is essential that variation in ball size is minimised. For this reason the maximum lot diameter variation is specified as twice the allowable spherical error 0.5µm for grade 10. When the same ball is used singly in a check valve this tight control of size within a lot is unnecessary. For this reason it is helpful to the requirements of a specific application in terms of the properties required from the ball, and then look for the highest grade that will satisfy them.This approach can avoid the specification of an unnecessarily high grade of ball and by doing so considerably reduce cost. |
|||||||||||||||||||||||||||||||||||||||||||||||||||||||||||||||||||||||||||||||||||||||||||||||||||||||||||||||||||||||||||||||||||||||||||||||||
Chrome Steel
|
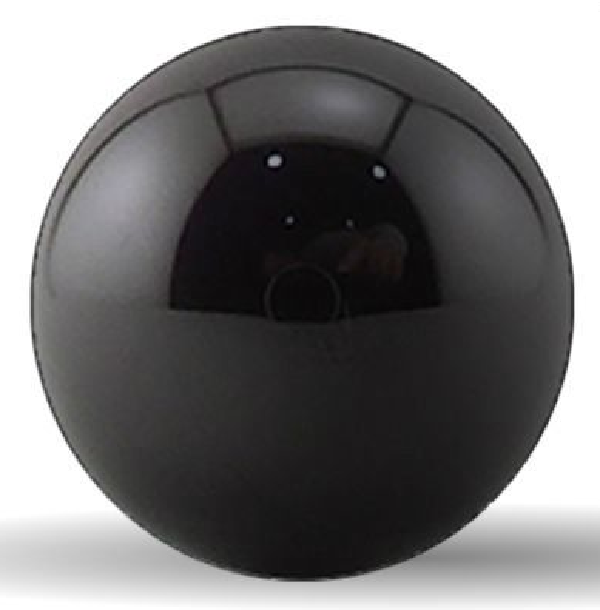
Ceramic - Silicon NitrideOf all the engineering ceramics so far developed, silicon nitride offers by far the best combination of properties for most applications.Its hardness, combined with toughness allows use in many situations where conventional ball materials fail, or have unacceptably short life. Its increasing use for high speed bearing applications and resulted in significant cost reduction such that it can now provide a cost effective solution for an ever increasing range of problems. |
||||||||||||||||||
|
Ceramic - Alumina
|
Ceramic - Zirconia
|
Tungsten Carbide - Cobalt binder
|
Tungsten Carbide - Nickel binder
|
 |
In addition to balls - our other products. |
Calibrated Master Ball SetsThese high quality ball sets are used extensively in: Standard Laboratories, Inspection Depadments, Tool Rooms and for measuring internal grooves, tapers and setting comparators.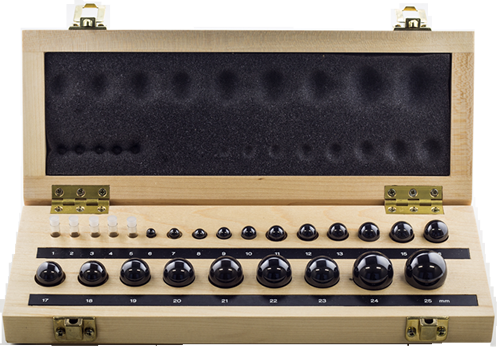 |
||
|
Each individual set can be supplied with or without its own wooden display case and certificate of calibration. These are the ultimate ball sets for total accuracy. l All Ball Sets available in Grade 10 or 25. |
||
|
l Manufactured in Tungsten Carbide of hardened Stainless Steel. l Supplied in an attractive solid ash case. l Available in Standard sets of
l In house (ISO 9002) Certificates supplied with each set. l Certificates traceable to NIST or NAMAS available on request. |
||
Ball Ended Plug Gauges |
||
|
Gauges are available double or single ended with Wire type handles. Applications: |
||
|
General Bore Gauging, Checking Radii, Thread and Gear Measurement. Advantages: Gauging is carried using a single ball diameter, and is correct irrespective of gauge alignment allowing rapid in-process checking without the risk of jammed or broken gauges. |
||
Fixture and Checking BallsTungsten Carbide and hardened Stainless Steel Balls are widely used to provide locations and position reference for both manufacturing tooling and for metrology. Tungsten carbide has the advantage of high hardness 1500 - 1600 Hv, and a low coeficient of expansion.Stainless Steel offers the same dimensional accuracy, and has a coefficient of expansion which matches most steels. It does require greater care in handling, but is prefered in some metrology and fixturing applications. |
|
| Examples shown are of our standard types, which are available in a range of sizes and configurations. Additionally, we frequently manufacture to customers drawings and specifications. | |
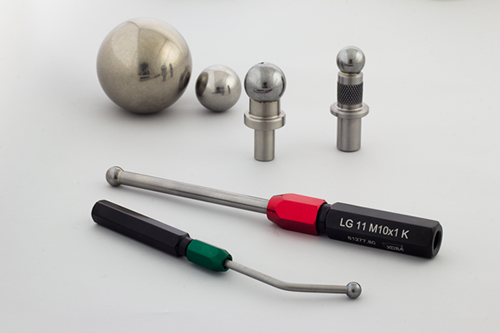
Custom Made ProductsBalls on Shafts, Stems, or Wires.For handling or identification purposes, having a ball attached to a stem or wire of some form can greatly simplify the use of the ball. In measurement applications, particularly if a range of similar size balls are used the ability to identify size visible can be of great advantage |
||
| Modified Balls Half or part balls, Balls with through or blind holes. Balls with internal threads, or flats. In many instances where a spherical or partially spherical surface is required, manufacture from all ball offers significant advantages in terms of accuracy or cost. |
||
| Ballizing Balls Ballizing provides a simple method of producing tightly controlled hole tolerances at very low cost. In practice ball of the appropriate size is pressed through a pre-machined bore causing plastic deformation to occur in the bore wall. Elastic recovery then takes place, and produces the final the final hole size. 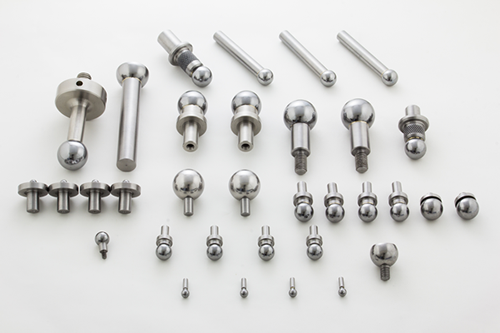 |
||
 |
Materials |
Ceramic BallsModern Engineering Ceramics are being used in increasing volumes throughout manufacturing industry. They offer a range of interesting and often valuable properties are difficult or indeed impossible to achieve with other materials. The nature of these materials, particularly the combination of hardness and stiffness makes them ideally suited to the production of high precision balls.Three materials have attracted particular attention for ball manufacture:-
|
Steel BallsOff all of the precision balls produced, probably more than 90% are steel, and the bulk of these are chrome steel. The scale of production is such that steel balls provide the most cost effective solution for all applications where their properties are appropriate.
|
Tungsten Carbide BallsTungsten Carbide or more correctly Cemented Tungsten Carbide is strictly a "cermet" - ceramic metal combination, where particles of ceramic, tungsten carbide, are bonded together in a metal matrix. Originally produced as a cutting tool material - a market which it now dominates, Tungsten Carbide is widely used where hardness and high wear resistance is required. Variation in the binder percentage, and the size of the carbide particles allows fine control over the properties of the material, hardness reducing and toughness increasing with increaing binder content. The binder material also contributes to the overall properties of the material.The two most common types are:-
|
Other MaterialsApart from the materials discussed separately, balls are made as standard in a variety of other materials. Some of the more common materials are listed here:-
|
 |
Terms and Conditions |
 |
FAQs |
| How thick is the case hardening on Chrome Steel Balls ? |
| Chrome Steel Balls are through hardened, case hardening is only used on carbon steel balls. |
| What are Standard Sizes, I always seem to have trouble obtaining 13mm steel balls quickly ? |
| Standard Sizes are no more those sizes that are made in large volume. In smaller sizes these will include whole and half millimeter, but as sizes increase half and then whole millimeter sizes become less common. The reason is simply that bearing manufacturers use what are really imperial sizes, 3.969mm, 5.556mm, 7.144mm, 12.7mm etc |
| I need to use a ball in a valve at 400C. Steel and TC wont work and ceramics are to brittle, what can I do. |
| Have you tried Ceramics ? Modern Engineering Ceramics are well suited to these sorts of application and in most circumstances are unlikely to fail. The materials are "brittle", as is cast iron, but the forces required to cause failure would cause similar failures in most other materials, including steel. |
 |
Hardness |
| Tensile Strength (N/mm2) | Hardness Vickers | Hardness Brinell* | HRB | HRF | HRC | HRA |
| 770 | 240 | 228 | 98.1 | 114.3 | 20.3 | 60.7 |
| 785 | 245 | 233 | 21.3 | 61.2 | ||
| 800 | 250 | 238 | 99.5 | 115.1 | 22.2 | 61.6 |
| 820 | 255 | 242 | 23.1 | 62.0 | ||
| 835 | 260 | 247 | (101) | 24.0 | 62.4 | |
| 850 | 265 | 252 | 25.8 | 62.7 | ||
| 865 | 270 | 257 | (102) | 25.8 | 63.1 | |
| 880 | 275 | 261 | 26.4 | 63.5 | ||
| 900 | 208 | 266 | (104) | 27.1 | 63.8 | |
| 915 | 285 | 271 | 27.8 | 64.2 | ||
| 930 | 290 | 276 | (105) | 28.5 | 64.5 | |
| 950 | 295 | 280 | 29.2 | 64.8 | ||
| 965 | 300 | 285 | 29.8 | 65.2 | ||
| 995 | 310 | 295 | 31.0 | 65.8 | ||
| 1030 | 320 | 304 | 32.2 | 66.4 | ||
| 1060 | 330 | 314 | 33.3 | 67.0 | ||
| 1095 | 340 | 323 | 34.4 | 67.6 | ||
| 1125 | 350 | 333 | 35.5 | 68.1 | ||
| 1155 | 360 | 342 | 36.6 | 68.7 | ||
| 1190 | 370 | 352 | 37.7 | 69.2 | ||
| 1220 | 380 | 361 | 38.8 | 69.8 | ||
| 1255 | 390 | 371 | 39.8 | 70.3 | ||
| 1290 | 400 | 380 | 40.8 | 70.8 | ||
| 1320 | 410 | 390 | 41.8 | 71.4 | ||
| 1350 | 420 | 399 | 42.7 | 71.8 | ||
| 1385 | 430 | 409 | 43.6 | 72.3 | ||
| 1420 | 440 | 418 | 44.5 | 72.8 | ||
| 1455 | 450 | 428 | 45.3 | 73.3 | ||
| 1485 | 460 | 437 | 46.1 | 73.6 | ||
| 1520 | 470 | 447 | 46.9 | 74.1 | ||
| 1555 | 480 | (456) | 47.7 | 74.5 | ||
| 1595 | 490 | (466) | 48.4 | 74.8 | ||
| 1630 | 500 | (475) | 49.1 | 75.3 | ||
| 1665 | 510 | (485) | 49.8 | 75.7 | ||
| 1700 | 520 | (494) | 50.5 | 76.1 | ||
| 1740 | 530 | (504) | 51.1 | 76.4 | ||
| 1775 | 540 | (513) | 51.7 | 76.7 | ||
| 1810 | 550 | (523) | 52.3 | 77.0 | ||
| 1845 | 560 | (532) | 53.0 | 77.4 | ||
| 1880 | 570 | (542) | 53.6 | 77.8 | ||
| 1920 | 580 | (551) | 54.1 | 78.0 | ||
| 1955 | 590 | (561) | 54.7 | 78.4 | ||
| 1995 | 600 | (570) | 55.2 | 78.6 | ||
| 2030 | 610 | (580) | 55.7 | 78.9 | ||
| 2070 | 620 | (589) | 56.3 | 79.2 | ||
| 2105 | 630 | (599) | 56.5 | 79.5 | ||
| 2145 | 640 | (608) | 57.3 | 79.8 | ||
| 2180 | 650 | (618) | 58.7 | 80.0 | ||
| 660 | 58.3 | 80.3 | ||||
| 670 | 58.8 | 80.6 | ||||
| 680 | 59.2 | 80.8 | ||||
| 690 | 59.7 | 81.1 | ||||
| 700 | 60.1 | 81.3 | ||||
| 720 | 61.0 | 81.8 | ||||
| 740 | 61.8 | 82.2 | ||||
| 760 | 62.5 | 82.6 | ||||
| 780 | 63.3 | 83.0 | ||||
| 800 | 64.0 | 83.4 | ||||
| 820 | 64.7 | 83.8 | ||||
| 840 | 65.3 | 84.1 | ||||
| 860 | 65.9 | 84.4 | ||||
| 880 | 66.4 | 84.7 | ||||
| 900 | 67.0 | 85.0 | ||||
| 920 | 67.5 | 85.3 | ||||
| 940 | 68.8 | 85.6 |
* calculate from HB = 0.95 x HV
| Ball Dia | Rockwell 'C' Readings | ||||||||||
| (mm) | 55 | 56 | 57 | 58 | 59 | 60 | 61 | 62 | 63 | 64 | 65 |
| 3.175 | 6.1 | 5.7 | 5.4 | 5.1 | 4.8 | 4.5 | 4.2 | 4.0 | 3.8 | 3.6 | 3.4 |
| 3.968 | 5.6 | 5.3 | 5.0 | 4.7 | 4.4 | 4.1 | 3.8 | 3.6 | 3.4 | 3.2 | 3.0 |
| 4.762 | 5.1 | 4.7 | 4.3 | 4.0 | 3.8 | 3.6 | 3.4 | 3.2 | 3.0 | 2.8 | 2.5 |
| 5.562 | 4.6 | 4.3 | 4.0 | 3.7 | 3.5 | 3.3 | 3.1 | 2.9 | 2.7 | 2.5 | 2.3 |
| 6.350 | 4.1 | 3.8 | 3.6 | 3.3 | 3.1 | 2.9 | 2.7 | 2.5 | 2.3 | 2.1 | 1.8 |
| 7.000 | 3.7 | 3.4 | 3.2 | 3.0 | 2.8 | 2.6 | 2.4 | 2.2 | 2.0 | 1.8 | 1.6 |
| 7.938 | 3.1 | 2.9 | 2.7 | 2.6 | 2.4 | 2.2 | 2.0 | 1.9 | 1.7 | 1.5 | 1.3 |
| 8.000 | 3.1 | 2.9 | 2.7 | 2.6 | 2.4 | 2.2 | 2.0 | 1.9 | 1.7 | 1.5 | 1.3 |
| 9.000 | 2.7 | 2.5 | 2.4 | 2.2 | 2.0 | 1.9 | 1.7 | 1.5 | 1.4 | 1.2 | 1.1 |
| 9.525 | 2.5 | 2.3 | 2.2 | 2.0 | 1.9 | 1.8 | 1.6 | 1.4 | 1.2 | 1.1 | 1.0 |
| 10.000 | 2.4 | 2.2 | 2.0 | 1.9 | 1.8 | 1.7 | 1.5 | 1.3 | 1.1 | 1.0 | 0.9 |
| 11.000 | 2.1 | 2.0 | 1.8 | 1.7 | 1.6 | 1.5 | 1.3 | 1.1 | 0.9 | 0.8 | 0.7 |
| 12.000 | 1.9 | 1.7 | 1.6 | 1.5 | 1.4 | 1.3 | 1.1 | 1.0 | 0.8 | 0.7 | 0.6 |
| 12.700 | 1.8 | 1.7 | 1.6 | 1.5 | 1.4 | 1.2 | 1.0 | 0.9 | 0.7 | 0.6 | 0.5 |
| 13.000 | 1.8 | 1.7 | 1.6 | 1.5 | 1.4 | 1.2 | 1.0 | 0.9 | 0.7 | 0.6 | 0.5 |
| 14.000 | 1.6 | 1.5 | 1.4 | 1.3 | 1.2 | 1.0 | 0.9 | 0.8 | 0.6 | 0.5 | 0.4 |
| 15.000 | 1.5 | 1.4 | 1.3 | 1.2 | 1.1 | 0.9 | 0.8 | 0.7 | 0.5 | 0.4 | 0.3 |
| 15.875 | 1.4 | 1.3 | 1.2 | 1.1 | 1.0 | 0.9 | 0.8 | 0.7 | 0.5 | 0.4 | 0.3 |
This table is useful for converting Rockwell 'C' readings taken on ball surfaces to equivalent value applicable to flat surfaces. Hardness readings of balls are affected by the curvature and hardness level of the ball. Because of these factors, corrections are necessarily added to the as-read hardness. For ball sizes and hardness values other than shown, values shall be interpolated.
 |
MATERIAL COMPARISON |
| Material AISI No. | Equivalents | Hardness HRc | Corrosion Resistance | ||||||||||||||||||
|---|---|---|---|---|---|---|---|---|---|---|---|---|---|---|---|---|---|---|---|---|---|
| Air | Water | Food | Liquor | Dilute Acids | Acids | Alkali | |||||||||||||||
| Industrial Atmosphere | Salt Air | Wet Steam | Domestic Water | Sea Water | Food Products | Fruit and Veg Juices | Dairy Products | Hot Sulphite | Dye | HCL | H2SO4 | HNO3 | Phosphoric | H2SO4 | HNO3 | Phosphoric | Ammonia | Alkaline Salts | |||
| Low Carbon AISI 1010-16 | Wks 1.0010 ASTM A29 EN32 | 60 min | 3 | T | 4 | 4 | T | T | T | T | T | T | T | T | T | T | S | T | TS | 2 | 3 |
| High Carbon AISI 1065-85 | Wks 1.0616 C85 EN8-9 | 60 min | 3 | T | 4 | 4 | T | T | T | T | T | T | T | T | T | T | S | T | T | 2 | 3 |
| High Carbon Chrome Alloy AISI 52100 | Wks 1.3505 100 CR6 EN31 | 60/67 | 3 | T | 4 | 4 | T | T | T | T | T | T | T | T | T | T | T | 1 | T | 3 | 2 |
| Stainless Steel AISI 440C | Wks 1.4125 X10⁵ CR M017 | 57/60 | 2 | 3 | 2 | 2 | T | 2 | 2 | 3 | T | 4 | T | T | T | T | T | T | T | 2 | 3 |
| Stainless Steel AISI 420 | Wks 1.3541 X45 CR13 EN56D | 52/55 | 2 | 4 | 1 | 1 | T | 3 | 3 | 2 | T | 3 | T | T | T | T | T | T | T | 2 | 3 |
| Stainless Steel AISI 302/304 | Wks 1.4301 X5 CR NI 1810 EN58E | 25/39 | 2 | 1 | 1 | 1 | 1 | 1 | 2 | 2 | 1 | 4 | 2 | 2 | 2 | 2 | 2 | 2 | 2 | 1 | 1 |
| Stainless Steel AISI 316 | Wks 1.4401 Z2 CND17.12 EN518J | 25/39 | 2 | 1 | 1 | 1 | 1 | 1 | 1 | 1 | 2 | 4 | T | 2 | 1 | 2 | 1 | 1 | 1 | 1 | 2 |
| Numbers indicate order of preference | |
|---|---|
| 1 = Excellent | |
| 2= Good | T = Will not withstand conditions |
| 3 = Fair | S = Satisfactory only over 75% concentration |
| 4 = Poor | |
 |
MEASUREMENT CONVERSIONS |
| Inch Fractions | Inch Decimals |
Metric (mm) |
Weight 1000 balls (kg) | Approximate Qty per Litre | Inch Fractions | Inch Decimals | Metric (mm) |
Weight 1000 balls (kg) |
| 1/64 | .0156 | 0.397 | .00026 | - | - | .7480 | 19.000 | 27.98 |
| - | .0197 | 0.500 | .00051 | - | 3/4 | .7500 | 19.050 | 28.20 |
| 1/32 | .0312 | 0.794 | .00210 | 2,100,000 | 25/32 | .7812 | 19.844 | 31.87 |
| - | .0394 | 1.000 | .00407 | 1,210,000 | - | .7874 | 20.000 | 32.63 |
| 3/64 | .0469 | 1.190 | .00688 | 695,000 | 13/16 | .8125 | 20.637 | 35.85 |
| - | .0472 | 1.200 | .00704 | 676,700 | - | .8268 | 21.000 | 37.77 |
| - | .0590 | 1.500 | .01377 | 347,000 | 27/32 | .8437 | 21.431 | 40.15 |
| 1/16 | .0625 | 1.588 | .01632 | 289,000 | - | .8661 | 22.000 | 43.43 |
| 5/64 | .0781 | 1.984 | .03187 | 151,000 | 7/8 | .8750 | 22.225 | 44.78 |
| - | .0787 | 2.000 | .0326 | 146,000 | - | .9055 | 23.000 | 49.63 |
| 3/32 | .0937 | 2.381 | .0550 | 87,000 | 29/32 | .9062 | 23.019 | 49.75 |
| - | .0984 | 2.500 | .0638 | 75,500 | 15/16 | .9375 | 23.812 | 55.07 |
| 7/64 | .1094 | 2.778 | .0875 | 55,000 | - | .9449 | 24.000 | 56.39 |
| - | .1181 | 3.000 | .1101 | 43,000 | 31/32 | .9687 | 24.606 | 60.77 |
| 1/8 | .1250 | 3.175 | .1305 | 37,000 | - | .9842 | 25.000 | 63.73 |
| - | .1378 | 3.500 | .1749 | 27,200 | 1 | 1.0000 | 25.400 | 66.84 |
| 9/64 | .1406 | 3.572 | .1859 | 25,700 | - | 1.0236 | 26.000 | 71.69 |
| 5/32 | .1562 | 3.969 | .2550 | 18,700 | 1.1/16 | 1.0625 | 26.987 | 80.17 |
| - | .1575 | 4.000 | .2610 | 18,500 | - | 1.1024 | 28.000 | 89.54 |
| 11/64 | .1719 | 4.366 | .3394 | 14,300 | 1.1/8 | 1.1250 | 28.575 | 95.17 |
| - | .1772 | 4.500 | .3716 | 13,000 | - | 1.1811 | 30.000 | 110.10 |
| 3/16 | .1875 | 4.762 | .4406 | 10,700 | 1.3/16 | 1.1875 | 30.162 | 111.90 |
| - | .1968 | 5.000 | .5099 | 9,500 | 1.1/4 | 1.2500 | 31.750 | 130.50 |
| - | .2165 | 5.500 | .6786 | 7,150 | - | 1.2598 | 32.000 | 133.70 |
| 7/32 | .2187 | 5.556 | .6996 | 6,800 | 1.5/16 | 1.3125 | 33.337 | 151.10 |
| 15/64 | .2344 | 5.953 | .8605 | 5,450 | - | 1.3386 | 34.000 | 160.30 |
| - | .2362 | 6.000 | .8810 | 5,400 | 1.3/8 | 1.3750 | 34.925 | 173.80 |
| 1/4 | .2500 | 6.350 | 1.044 | 4,550 | - | 1.3780 | 35.000 | 174.90 |
| - | .2559 | 6.500 | 1.120 | 4,300 | - | 1.4173 | 36.000 | 190.30 |
| 17/64 | .2656 | 6.747 | 1.253 | 3,800 | 1.7/16 | 1.4375 | 36.512 | 198.50 |
| - | .2756 | 7.000 | 1.399 | 3,400 | - | 1.4960 | 38.000 | 223.80 |
| 9/32 | .2812 | 7.144 | 1.487 | 3,250 | 1.1/2 | 1.5000 |
38.100 | 225.60 |
| - | .2953 | 7.500 | 1.721 | 2,800 | 1.9/16 | 1.5625 | 39.687 | 255.00 |
| 19/64 | .2969 | 7.541 | 1.749 | 2,750 | - | 1.5748 | 40.000 | 261.00 |
| 5/16 | .3125 | 7.938 | 2.040 | 2,350 | 1.5/8 | 1.6250 | 41.275 | 286.80 |
| - | .3150 | 8.000 | 2.088 | 2,150 | 1.11/16 | 1.6875 | 42.862 | 321.20 |
| - | .3346 | 8.500 | 2.505 | 1,900 | 1.3/4 | 1.7500 | 44.450 |
358.20 |
| 11/32 | .3437 | 8.731 | 2.715 | 1,750 | - | 1.7716 | 45.000 | 371.70 |
| - | .3543 | 9.000 | 2.973 | 1,600 | 1.13/16 | 1.8125 | 46.037 | 398.00 |
| 23/64 | .3594 | 9.128 | 3.102 | 1,480 | 1.7/8 | 1.8750 | 47.625 | 440.60 |
| - | .3740 | 9.500 | 3.497 | 1,350 | 1.15/16 | 1.9375 | 49.212 | 486.10 |
| 3/8 | .3750 | 9.525 | 3.525 | 1,300 | - | 1.9685 | 50.000 | 509.90 |
| 25/64 | .3906 | 9.922 | 3.983 | 1,150 | 2 | 2.000 | 50.800 | 534.70 |
| - | .3937 | 10.000 | 4.079 | 1,125 | 2.1/8 | 2.1250 | 53.975 | 641.40 |
| 13/32 | .4062 | 10.319 | 4.481 | 1,050 | - | 2.1653 | 55.000 | 678.60 |
| - | .4331 | 11.000 | 5.429 | 820 | 2.1/4 | 2.2500 | 57.150 | 761.30 |
| 7/16 | .4375 | 11.112 | 5.597 | 810 | - | 2.3622 | 60.000 | 881.00 |
| - | .4528 | 11.500 | 6.203 | 720 | 2.3/8 | 2.3750 | 60.325 | 895.40 |
| 29/64 | .4531 | 11.590 | 6.219 | 720 | 2.1/2 | 2.5000 | 63.500 | 1044.40 |
| 15/32 | .4687 | 11.906 | 6.884 | 620 | - | 2.5590 | 65.000 | 1120.10 |
| - | .4724 | 12.000 | 7.048 | 615 | 2.5/8 | 2.6250 | 66.675 | 1209.00 |
| 31/64 | .4844 | 12.303 | 7.596 | 610 | 2.3/4 | 2.7500 | 69.850 | 1390.10 |
| 1/2 | .5000 | 12.700 | 8.355 | 550 | - | 2.7559 | 70.000 | 1484.70 |
| - | .5118 | 13.000 | 8.961 | 490 | 2.7/8 | 2.8750 | 73.025 | 1588.40 |
| 17/32 | .5312 | 13.494 | 10.02 | 450 | - | 2.9528 | 75.000 | 1720.70 |
| - | .5512 | 14.000 | 11.19 | 410 | 3 | 3.000 | 76.200 | 1804.70 |
| 9/16 | .5625 | 14.288 | 11.90 | 380 | 3.1/8 | 3.1250 | 79.375 | 2039.80 |
| - | .5905 | 15.000 | 13.77 | 325 | - | 3.1500 | 80.000 | 2088.30 |
| 19/32 | .5937 | 15.081 | 13.99 | 320 | 3.1/4 | 3.2500 | 82.550 | 2294.40 |
| 5/8 | .6250 | 15.875 | 16.32 | 300 | - | 3.3464 | 85.000 | 2530.90 |
| - | .6299 | 16.000 | 16.70 | 275 | 3.1/2 | 3.5000 | 88.900 | 2865.70 |
| 21/32 | .6562 | 16.669 | 18.89 | 240 | - | 3.5433 | 90.000 | 2993.40 |
| - | .6693 | 17.000 | 20.04 | 230 | - | 3.7401 | 95.000 | 3521.10 |
| 11/16 | .6785 | 17.462 | 21.72 | 205 | 3.3/4 | 3.7500 | 95.250 | 3524.70 |
| - | .7087 | 18.000 | 23.79 | 190 | - | 3.9370 | 100.000 | 4078.80 |
| 23/32 | 27187 | 18.256 | 24.82 | 180 | 4 | 4.000 | 101.600 | 4277.70 |
The weights shown are based on Chrome Alloy Steel balls.
Approximate weights for other materials can be obtained by multiplying the weight per 1000 balls by the following figures:-
Carbon Steel |
1.004 |
Stainless Steel AISI 420/440 |
0.979 |
Stainless Steel AISI 302/304 |
1.011 |
Stainless Steel AISI 316 |
1.025 |
Brass |
1.074 |
Tungsten Carbide |
1.907 |
 |
GRADES |
| Grade | Ball Dia. Variation (µm) |
Deviation from Spherical Form (µm) |
Surface Roughness (µm) |
Lot Dia. Variation (µm) |
Gauge Interval (µm) |
Preferred Gauge (µm) |
Subgauge Interval (µm) |
Subgauge (µm) |
| G3 | 0.08 | 0.08 | 0.010 | 0.13 | 0.5 | -5...-0.5 0 +0.5...+5 | 0.1 | -0.2,-0.1, 0, +0.1,+0.2 |
| G5 | 0.13 | 0.13 | 0.014 | 0.25 | 1 | -5...-1 0 +1...+5 | 0.2 | -0.4,-0.2, 0, +0.2,+0.4 |
| G10 | 0.25 | 0.25 | 0.020 | 0.5 | 1 | -9...-1 0 +1...+9 | 0.2 | -0.4,-0.2, 0, +0.2,+0.4 |
| G16 | 0.4 | 0.4 | 0.025 | 0.8 | 2 | -10...-2 0 +2...+10 | 0.4 | -0.8,-0.4 0, +0.4,+0.8 |
| G20 | 0.5 | 0.5 | 0.032 | 1 | 2 | -10...-2 0 +2...+10 | 0.4 | -0.8,-0.4 0, +0.4,+0.8 |
| G24 | 0.6 | 0.6 | 0.040 | 1.2 | 2 | -12...-2 0 +2...+12 | 0.4 | -0.8,-0.4 0, +0.4,+0.8 |
| G28 | 0.7 | 0.7 | 0.050 | 1.4 | 2 | -12...-2 0 +2...+12 | 0.4 | -0.8,-0.4 0, +0.4,+0.8 |
| G40 | 1 | 1 | 0.060 | 2 | 4 | -16...-4 0 +4...+16 | 0.8 | -1.6,-0.8, 0, +0.8,+1.6 |
| G60 | 1.5 | 1.5 | 0.080 | 3 | 6 | -18...-6 0 +6...+18 | 1.2 | -2.4,-1.2, 0. +1.2,+2.4 |
| G100 | 2.5 | 2.5 | 0.100 | 5 | 10 | -40...-10 0 +10...+40 | 2 | -4,-2, 0, +2,+4 |
| G200 | 5 | 5 | 0.150 | 10 | 15 | -60...-15 0 +15...+60 | 3 | -6,-3, 0, +3,+6 |
|
|